In 2013, Amazon was The Third Largest global manufacturer of Android tablets (9,401,846 total tablets sold to end users), behind Samsung (37,411,921) and ASUS (11,039,156 ), of according to research firm Gartner. Amazon’s Kindle Fire tablets HDX May not be the best-selling Android tablets today, but They are unique and Particularly well-suited for Certain kinds of users – including BYOD enterprise tablet owners. (Check out my quick comparison of the Kindle Fire HDX 8.9 to Apple’s iPad Air.)

Amazon’s “Flavor” of the Android OS, the Fire OS 3.2, is based on Android 4.2.2 “Jelly Bean,” but in many ways it feels very different than the OS, Google geeks have come to know. As such the Kindle Fire OS and Kindle Fire tablets HDX havetheir own sets of unique Tips and Tricks.
After spending time with bothering the Kindle Fire 7 HDX and HDX 8.9 Kindle Fire tablets During the past months, I rounded up the Following 10 Simple Tips and Tricks, Which everytime Amazon tablet owner should know.
Kindle Fire HDX “Hard Reset”
Sometimes tablets, like all electronics, misbehave. If your Kindle Fire tablet HDX ever freezes up or just starts acting funny, your first course of action Should be a “hard reset,” Which basically forces the device to shut down and reset itself.
to hard-reset your Kindle Fire HDX, simply hold down the power button on its rear side for 20 seconds Until The device shuts down. Wait a few more seconds, then turn the device back on by holding the powerbutton Until you see the animation screen, and you’re good to go.
Kindle Fire OS and App ‘Collections’
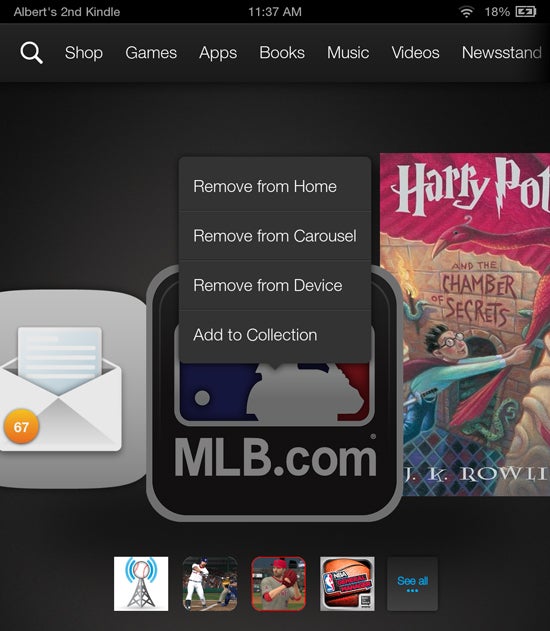
You can create “Collections” of Kindle Fire apps, or folders, on your tablet’s homescreen to organize your software and streamline navigation. Simply tap and hold an app you wish to add to a Collection and then drag it onto another app. A New Collection, or folder, Will be Automatically created, and you can add a custom name by opening the Collection and tapping on the text of the name.
You Can overpriced Quickly add apps from your home screen “Carousel” to a Collection by tapping and holding the app and then Choosing the “Add to Collection” from the on-screen options.
I use Collections for Social Networking, Photography, and Music and Sports apps, Among Other Things. Organizing My Software Into the Appropriate Collections Helps Reduce clutter on my home screen and makes it simple to find the apps I want when i want them.
Removing Items from the Home Screen Carousel
Whenever you open a new app, service or file, the Corresponding app shows up in your homescreen Carousel. But I like to keep only the apps I use frequently in my Carousel, to Reduce the Need to scroll to access My most Commonly used apps. To remove an app from your Carousel, simply holding a finger on the app you wish to remove Until you see a list of options. Select “Remove from Carousel” to delete the item from your Carousel.
Ditch The Recommendations in Your Carousel
The Kindle Fire OS, by default, shows you the apps and other content related to items in your Carousel, by displaying a set of small icons beneath each item in the Carousel . The icons can be helpful for finding interesting content, but overpriced They add clutter to your already-busy homescreen. Sometimes They feel like ads, Which can get tedious quickly.
Luckily, it’s easy to disable the icons. Open Your Kindle Fire HDX Settings by dragging down from the top of your screen and tapping the Settings option. Scroll down and tap the Home Screen option, and then disable the Show / Hide Recommendations option by tapping the button into the Hide position.
Capture a Screenshot on Your Kindle Fire HDX
Quickly capturing images of you Kindle Fire HDX display is simple, thanks to a built-in screenshot command. To grab a screenshot of your tablet’s display, press and hold the Volume Up and Power keys Simultaneously Until you see the screen flash. To access your screenshots, Click the Photos tab in the slider at the top of your home screen, then choose the Device option from the drop down menu in the top-left corner of your gallery. A folder aptly named “Screenshots” houses all of your screenshots.
Collapse and Expand Mail Notifications
If you have multiple new email messages in the same inbox, your status bar will Eventually group all the new message notifications together and show you only the text message icon and a number to Represent the total number of new messages.

You can expand the Grouped notifications in your drop down status bar to display more details about each message, including senders and subject lines for each message, without opening your inbox. Or If You Want to free up space in your status bar, you can collapse a list of email notifications into a single line.
To Expand Grouped text message notification bar and see message details, holding a finger against the email icon and slide your finger down. To collapse an open new-message notification bar, holding a finger against the email icon and slide your finger up.
Show Battery Percentage In Status Bar
Your Kindle Fire shows you its remaining battery level via a battery icon on the right side of your status bar by default. But a Battery Percentage setting gives you a more specific look at how much life is left in your device by showing a percentage-number next to the icon.
To enable the Battery Percentage feature, slide your finger down from the top of your Kindle Fire screen to expand your status bar and tap the Settings icon. Tap the Device options and then flip the switch next to “Show Battery Percentage In Status Bar ‘to the on position.
Free Up Storage Space With 1-Tap Archive
The Kindle Fire OS has a unique 1-Tap Archive feature that’s designed to quickly identify the apps and services you have not used for a week or more and then archive them to clear storage space on your device. Any content you choose to archive using 1-Tap Archive is available to you in your Amazon cloud Whenever you have Web access.

To Initiate a 1-Tap Archive, pull down your status bar, tap the Settings option, then tap Device and finally tap Storage. Beneath a graphical representation of your Kindle Fire’s storage status, you see an option for 1-Tap Archive. After you tap the option, you see a list of apps and Services That You Have not used for a week or more, each with a check box next to Their Names. You can check or uncheck the boxes next to specific items, to specify Which ones you want to remove and Which You Want To Keep. Just tap the Archive button at the bottom of your display When You’re Ready to Start the process.
Disable Special Offers on Your Kindle Lockscreen
Amazon offers a couple of different pricing options for new Kindle Fire tablets HDX. You can get $ 15 off of the retail price if you opt to have “special offers,” Which are basically ads for movies, music, apps, games and other content, on your tablet’s lockscreen; Or you can pay the full retail price, avoid the lock-screen ads, and get control over your lock-screen wallpaper.
I suspect thatmany Kindle buyers will opt for the cheaper option with lock-screen victims , only to find That after a few days (maybe even hours), they’re second-guessing the decision. Those offers can be very annoying. Thankfully, Amazon lets you pay the $ 15 to get rid of the special offers after you purchase a Kindle at the discounted price.

To pay $ 15 and disable the lock-screen offers on your Kindle Fire HDX, visit your My Kindle page, located at http://amazon.com/myk. In the Navigation menu on the left side of the page, click the Manage Your Devices option, select the Appropriate Kindle from the list of devices and then click the Manage This Device button. You’ll see a list of options, including one for Special Offers. If the victims are active, you see the word “Subscribed” with an edit link next to it. Click the Edit link, and choose the “Unsubscribe Now with 1-Click” option. Your account will be charged $ 15 and you’ll never see Those lock-screen victims again.
Encrypt Your Data for Added Security
The Kindle Fire OS has an on-device data encryption option That Protects all of the data stored on your tablet. It’s designed Mainly for enterprise use, Because many Organizations Require data encryption as part of the process to connect devices to the corporate infrastructure. But anyone who wants to bolster data security can encrypt the data on Their Kindle.
To encrypt your data, pull down the status bar from the top of your screen and tap Settings. Tap the Security option and then tap Encryption and follow the on-screen instructions. The encryption process can take a while if you have a lot of data on your Kindle; I’ve had about 2GB When I encrypted my tablet, and it took roughly 20 minutes. You could have to recharge your tablet and keep it plugged into During encryption. And you also need to set an encryption password thatwill be required everytime you shutdown and power on your tablet.
AS
Al Sacco covers Mobile and Wireless for CIOs .com. Follow Al on TwitterASacco. Follow everything from CIO.com on TwitterCIOonline, Facebook, Google + and LinkedIn.
![]()
No comments:
Post a Comment